
The most common reason people stop meditating is not a lack of discipline or a busy mind. It is pain. Specifically, the low back ache that starts around minute seven, the knee pressure that becomes impossible to ignore by minute twelve, and the stiff neck that turns the last three minutes of a sit into a negotiation with your own body. I spent almost two years blaming my inflexibility for this. My hips were tight, I told myself. My hamstrings needed more work. If I just stretched more, the sitting would get easier.
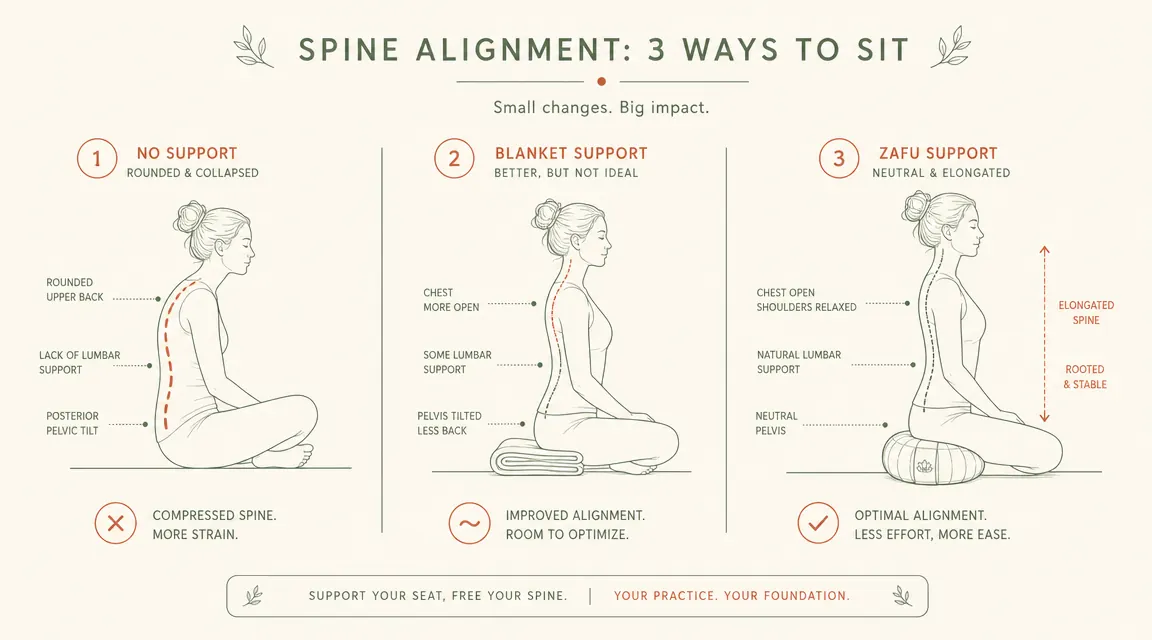
Then a teacher I respect told me something that changed the whole picture: most meditation discomfort comes from posture, not physiology. Specifically, it comes from a pelvis that cannot tilt forward enough to put the lumbar spine in its natural curve when you sit on a flat surface. The fix is not years of hip-opening practice. It is a few inches of lift. Once I understood that, the conversation stopped being about willpower and started being about setup.
Your hips are not the problem. Your seat is.
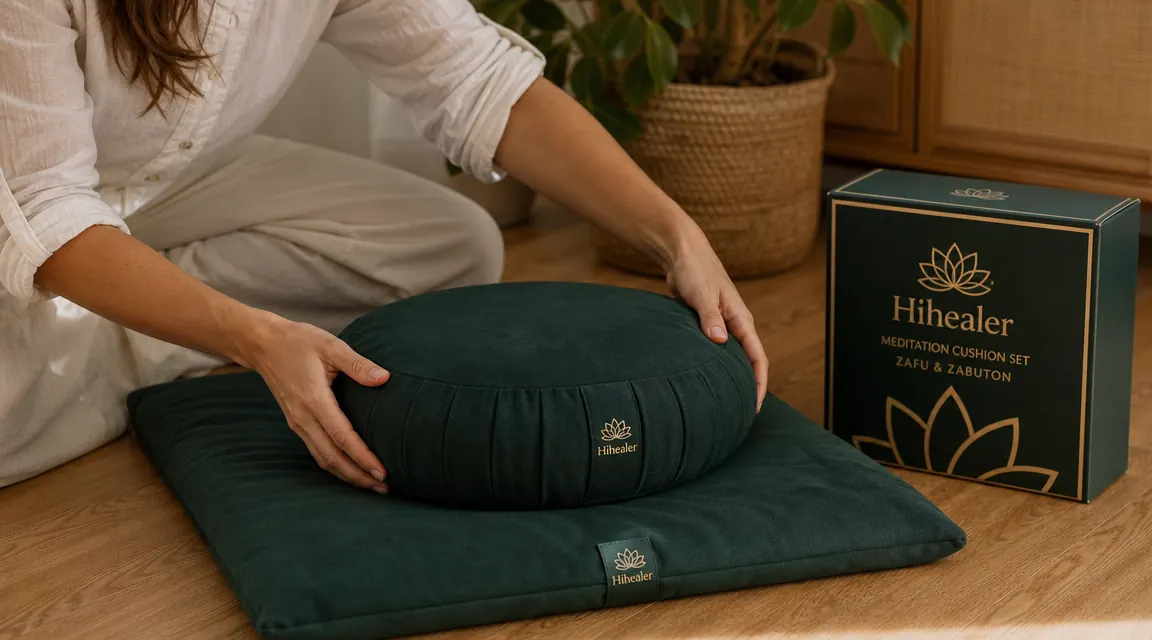
The Hihealer Meditation Cushion Set pairs a buckwheat-filled zafu with a padded zabuton mat, giving your pelvis the forward tilt that makes long sits physically sustainable. Rated 4.8 stars from over 2,300 practitioners.
Amazon Check Today's Price on Amazon →Step 1: Understand What Is Actually Causing the Pain
Before adjusting anything, it helps to know the source. Pain during seated meditation usually falls into one of three categories: lumbar compression (low back), sacroiliac strain (the point where the lower spine meets the pelvis), or knee or ankle pressure from the floor. The first two are almost always posture-related. The third is usually a combination of floor hardness and sitting position.
When you sit on a flat, hard surface with your legs crossed, your pelvis tends to tuck under rather than tilting forward. This rounds your lower back, collapses the lumbar curve, and puts your spine in a position it was not designed to hold for twenty minutes. Your back muscles compensate. Your neck cranes forward to balance the collapse. The whole chain tightens within minutes. This is not a flexibility problem. This is geometry.
Knowing this shifts the whole approach. Instead of stretching before you sit (which helps but does not solve the root problem), you change the height and angle of your seat so that your pelvis can tip forward naturally. When the pelvis tilts, the lumbar curve returns. The spine stacks. The muscles relax. The neck settles. The body stops being the loudest thing in the room.
Step 2: Choose the Right Seat Height for Your Body
Seat height is the single most important variable. Too low and the pelvis tucks; too high and the knees float uncomfortably or the hips feel unstable. The right height is one where both knees can rest on or close to the floor while the pelvis tips slightly forward, allowing the lower back to settle into its natural inward curve.
The traditional buckwheat zafu sits roughly 5 to 6 inches off the ground in its standard fill. That is the right range for most adults with average hip flexibility when sitting in a simple cross-legged position. If your knees float well above the floor even with cushion support, you may need more height initially, which you can achieve by sitting on the edge of the cushion rather than centered on it, or by adding a folded blanket beneath it. If your knees press easily to the floor and you feel stable, centered is fine.
The Hihealer zafu uses buckwheat hull filling specifically because buckwheat conforms slowly to your shape and holds its loft. Foam compresses quickly and loses height within a single session. A deflated cushion defeats the purpose. Buckwheat stays, which is why it has been the standard in Zen and Tibetan practice for centuries.
Step 3: Set Up Your Base Layer to Protect the Knees
The zafu handles pelvic tilt. The zabuton mat underneath it handles everything from the knees down. When you sit cross-legged on a hard floor, the bony prominences of your ankles and outer knees take direct pressure against an unforgiving surface. Over time, or even within a single long sit, this becomes genuinely uncomfortable. A zabuton is a large, lightly padded mat that the zafu rests on, cushioning the knees and ankles without raising you so high that you lose stability.
The Hihealer set includes both the zafu cushion and a traditional zabuton mat, which matters because the two are designed to work together. The zabuton dimensions are wide enough to accommodate your crossed legs fully, so no part of your lower body is making contact with bare floor. If you have been meditating on just a yoga mat or a thin rug, this will feel like a noticeable upgrade in the first session.

Step 4: Adjust Your Position Within the Sit
Even with the right cushion height, your body will shift during a long sit. This is normal. The practice is not to hold a static position but to return your attention, including physical attention, when it drifts. Here are the micro-adjustments that make the longest difference.
Check your pelvis first. If you feel your low back rounding or the seat of your cushion flattening under you, shift slightly forward on the zafu so that more of your weight rests on the front half. This encourages the forward pelvic tilt again. If one hip is higher than the other, check whether your sitting bones are centered on the cushion. An asymmetric base creates rotational tension in the sacrum that eventually becomes hard to ignore.
Check your hands. Hands that are held too high create shoulder tension. Let them rest fully on your thighs or in your lap with no effort required to hold them there. Let your arms hang slightly forward from the shoulder socket rather than pulling back. This small release drops the shoulder girdle and softens the upper chest.
Check your jaw and tongue. These are the places where subtle tension hides. A lightly parted jaw and a tongue resting softly on the roof of the mouth rather than pressing against the teeth can release an entire chain of facial and neck tension. It sounds small. It is not small.
The body is not your opponent in meditation. It is your first teacher. When it hurts, it is giving you information. Usually the information is: adjust the seat.
Step 5: Build Duration Gradually, the Way You Would in Any Physical Practice
Even with a proper setup, you do not simply sit for forty minutes on day one. The tissues around the hips, knees, and ankles need time to adapt to this specific demand. The approach is the same as it would be with any physical practice: start with what is comfortable, add two to three minutes each week, and let the body adjust between sessions.
A practical starting point for someone who currently finds sitting painful is ten minutes. Set a timer. Commit to staying in the seat for that duration regardless of discomfort, as long as the discomfort is the dull ache of unfamiliar positioning rather than sharp or shooting pain. Sharp or shooting pain means stop and adjust immediately; dull ache is often just the body meeting a new demand. After two weeks at ten minutes, move to twelve or thirteen. After two more weeks, fifteen. This is not slow. This is how practices are built.
Most people who complain that they cannot sit for more than five minutes have never had a proper seat setup and have never built duration incrementally. They start at twenty minutes, hit a wall of discomfort at seven, and conclude that meditation is not for their body. It almost certainly is. The setup just needed attention first.
What Else Helps
A good cushion solves the structural problem. A few complementary habits extend how far the structural solution can take you. Spending five minutes in a reclined hip-opener like supta baddha konasana before you sit softens the tissue that would otherwise resist the position. A few gentle cat-cow movements at the start of your sit remind the lumbar spine what its full range of motion feels like before you ask it to hold a position.
After a long sit, rather than standing abruptly, spend a minute in a gentle forward fold or a seated twist. This releases the compression that builds in the lumbar during stillness. It also serves as a gentle close to the practice, a transition that honors what just happened rather than rushing back into the day. These are small rituals. But rituals done consistently compound into a body that makes sitting feel like home.
If you have chronic low back issues or a known sacroiliac joint condition, a seated chair meditation with both feet flat on the floor may be the right foundation for you. The same pelvic alignment principles apply: sit toward the edge of the chair, let the pelvis tilt slightly forward, keep the spine long. A cushion placed at the base of your chair back can replicate some of the lumbar support a zafu provides. The position is different but the goal is the same: a spine that is awake and aligned rather than collapsed or rigid.
Eight months in, the buckwheat still holds. The practice has not.
The Hihealer Meditation Cushion Set is the zafu and zabuton combination built for practitioners who are serious about sitting longer. Buckwheat filling that does not compress, velvet that does not show wear, and a size that fits most adults in cross-legged or kneeling positions. Over 2,300 reviews, 4.8 stars.
Amazon Check Today's Price on Amazon →